 Skip to content
 How to Mine Alephium with BZMiner
BZMiner Alephium
Alephium mining support was introduced in BZMiner version 7, making it easy to start mining this innovative cryptocurrency. This guide will walk you through the process of configuring BZMiner to mine Alephium effectively.
Important Note:
BZMiner supports two network protocols for Alephium mining: stratum and alphstratum. Solo mining to a full node or using the devgent mode requires the “alphstratum” protocol. While BZMiner attempts to auto-select the correct protocol, it’s important to verify that it matches your specific setup.
Command Line Interface (CLI) Setup
-
Download BZMiner:
- Start by downloading the latest version of BZMiner (Windows & Linux).
- Extract the contents of the archive to a convenient location on your computer.
- Reference Script:
- Inside the extracted files, locate the reference script (
alph.batfor Windows oralph.shfor Linux). This script serves as a template for mining Alephium with BZMiner.
Basic Command:
bzminer -a alph -w 000000 000000 000000 000000 -p stratum+tcp://yourpool
- Replace each
000000with your respective wallet addresses, keeping the correct order. - Replace
yourpoolwith the address and port of the pool you want to mine to.
Example:
bzminer -a alph -w 000000 000000 000000 000000 -p stratum+tcp://pool.woolypooly.com:3106
Some pools require all four wallet addresses for mining, including solo mining, while others may support a single wallet address. Ensure you know your pool’s requirements.
Config.txt Setup
Download and Extract:
- As before, download the latest version of BZMiner and extract the archive.
Edit Config.txt:
Locate and open the
config.txtfile within the extracted folder.In the
pool_configssection near the top of the file, you will see pool configuration templates.Modify the template to include:
- Algorithm: Set to
alph. - Wallet: Enter your wallet addresses (use a JSON array for multiple addresses, or a single string with comma/space-separated addresses).
- URL: Input the pool URL(s) you want to mine to.
- Algorithm: Set to
Example Config:
{
"pool_configs": [{
"algorithm": "alph",
"wallet": ["00000", "00000", "00000", "00000"], // replace 00000 with your wallet addresses
"url": ["stratum+tcp://pool.woolypooly.com:3106"], // replace with your desired pool URL. Add multiple pools for failover protection.
"username": "worker_name",
"lhr_only": false
}],
"pool": [0], // the default pool config to use unless overridden
"rig_name": "rig",
"log_file": "",
"nvidia_only": false,
"amd_only": false,
"auto_detect_lhr": true,
"lock_config": false,
"advanced_config": false,
"advanced_display_config": false,
"device_overrides": []
}
Hive OS Setup for Alephium Mining
Visit the Hive OS website: Start the setup process by heading to the Hive OS website.
Update Hive OS: Ensure your Hive OS rig is running the latest version to guarantee optimal performance and compatibility.
Create a Flight Sheet: Go to the Flight Sheets section and create a new one.
Set the Coin: Choose
ALPHas the coin you wish to mine.Add a Wallet: Enter your Alephium wallet address. If you need to add multiple wallet addresses, separate them by commas or spaces.
Configure the Pool: Select “Configure in miner” in the Pool section to manually input the pool settings.
Choose the Miner: Select
BZMineras your miner.Name Your Flight Sheet: Assign a unique name to your flight sheet that will help you easily identify it.
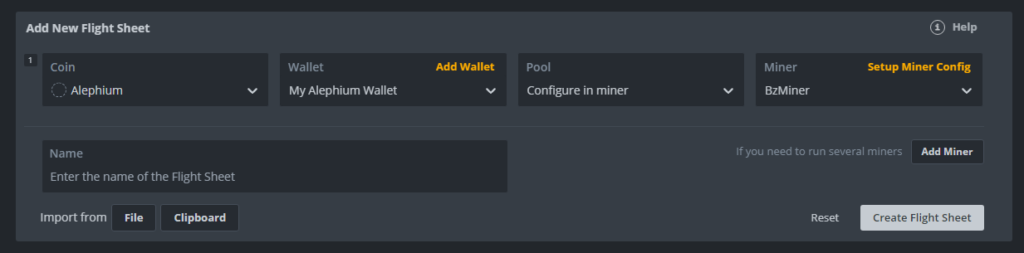
In the Miner section, select Setup Miner Config.

In the BzMiner configuration panel that opens, set the Hash algorithm to alph.
For the Wallet template, enter %WAL% or directly input your wallet address.
Assign a Worker name to identify this rig on the pool.
Enter the Pool URL where you intend to mine (e.g., stratum+tcp://pool.woolypooly.com:3106).
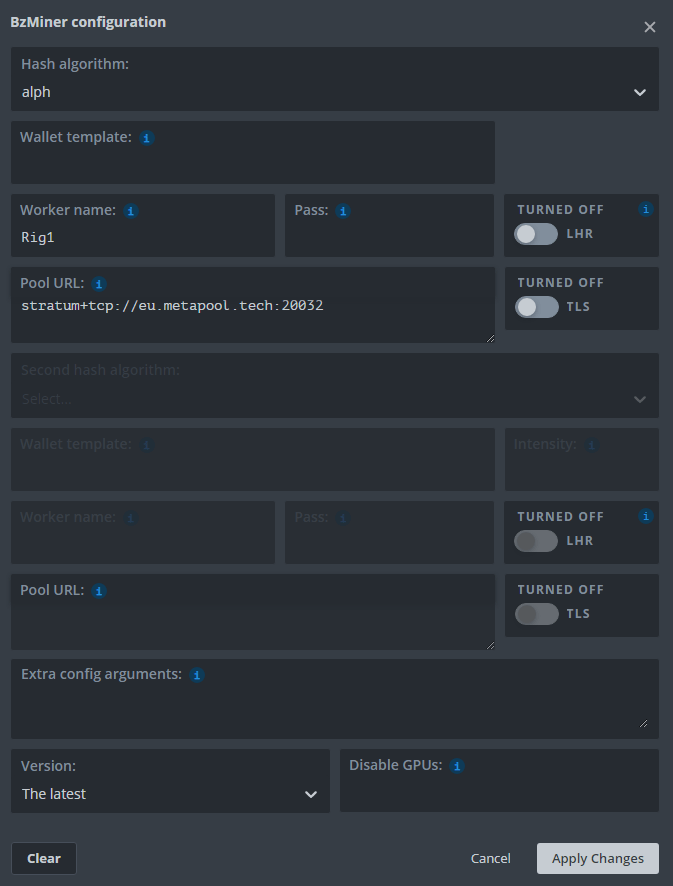
After configuring these settings, click “Apply Changes” and deploy the setup to the rigs you want to use for Alephium mining.
Configuring Arguments in HiveOS
Setting Config Parameters:
To configure config.txt parameters in HiveOS, you can utilize the Extra config arguments field within the BzMiner configuration window. This field allows you to input configuration settings as you would in the config.txt file.
For instance, to set overclocking (OC) parameters for three devices, you would enter the following:
"oc_fan_speed": "[-1, 80, 0]",
"oc_power_limit": "[0, 250, 0]",
"oc_core_clock_offset": "[100, 200, 100]",
"oc_memory_clock_offset": "[0, 0, 0]",
"oc_lock_core_clock": "[0, 0, 0]",
"oc_lock_memory_clock": "[810, 0, 810]"
Starting from version 8.0.0, BzMiner supports using JSON arrays for OC parameters, which helps bypass HiveOS interface limitations with JSON arrays.
Solo Mining Setup
Run the Full Node:
- Start by launching the full node, which can be found here.
Configure BzMiner:
- Follow the standard setup guides but replace the pool URL with your full node’s IP address and port number
10973. - Since the full node uses the
alphstratumprotocol, your URL should be formatted asalphstratum+tcp://.
Command Line Example:
- If mining on the same PC where the full node is running, use the IP address
127.0.0.1:
- Follow the standard setup guides but replace the pool URL with your full node’s IP address and port number
bzminer -a alph -w 000000 000000 000000 000000 -p alphstratum+tcp://127.0.0.1:10973
- Remote Mining Setup:
- If you’re mining from a remote PC (where BzMiner is running on a different machine than the full node), you must modify the full node’s configuration to allow external connections by adding the following line to the config file:
alephium.mining.api-interface = "0.0.0.0"
On the remote PC, use the IP address of the machine where the full node is running to connect.